The ultimate guide on the middlegame principles of chess
The middlegame is one of the most complex phases in chess where planning and initiative are highlighted. It is the time where most of the pieces are active and something should happen.
I am sure you have heard about many theoretical openings, maybe even a lot of checkmating patterns in the endgame. But have you heard about the principles used in the middlegame? I bet it is not something you read often.
This is why I have created this article to help you learn some general principles to deal with this stage. I have struggled with it after all. I seek to provide you a better experience than I did. There is not a lot of information out there, this should supplement it.
This guideline should help you play effectively once implemented at the discretion of your own games. I don’t want you to keep you waiting so I’m just going to head into it.
Where should the pieces be located in the middlegame?
Pieces should be developed outside their starting squares preferably near the center (since it has more space) in the middlegame.
Principle # 1. Centralize your pieces
The pieces in their own starting tile usually don’t have any role to accomplish in there, making them pretty inactive. This means that developing the pieces and getting them to their respective post should be a priority early in the game.
But not just early in the game but also early in the middlegame, where individual pieces may still remain inactive not doing anything. So you should start getting the pieces out there (in the middlegame) preferably near the center since it has more space.
Pieces near the edge usually don’t perform as well since the movement options are limited in the corner, unlike the center.
Having many good centralized pieces in the middlegame is a good setup that would provide attacking opportunities and positional plans.
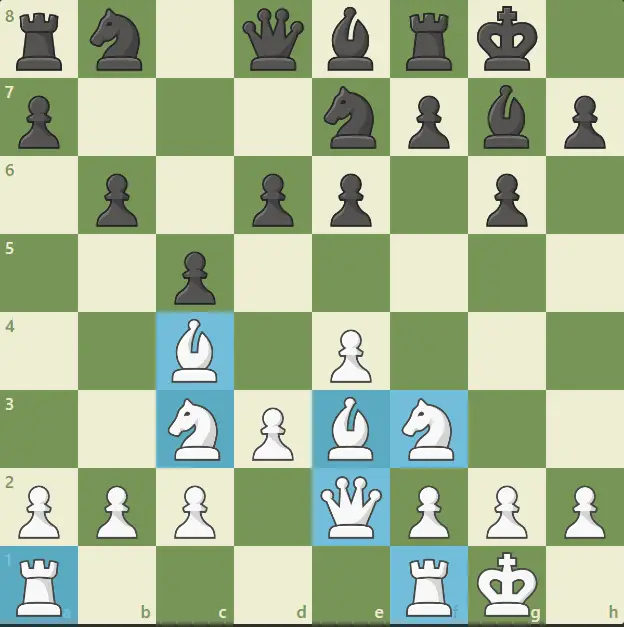
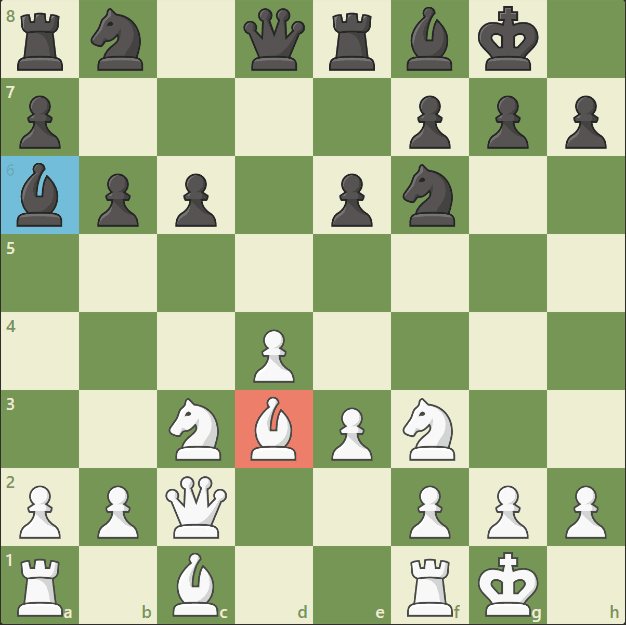
Just look at the pieces of white here that are just dominating in activity since everyone is pointing near the center. It’s not that hard to find a plan in this position since everything is not cramped and there are openings.
This is an extreme contrast to black’s position, where the pieces are not only centralized but inactive as well. It’s really hard to play black here since there is so little influence its pieces put on the board.
This is why you should centralize the pieces during the middlegame, it just makes things easier due to the added space. You don’t want to play as black here having less centralized pieces and having slim options of moves makes the game harder to play.
How should the rooks be positioned in the middlegame?
Rooks should be connected to each other (usually after castling) in the middlegame, where it can be used to control open files free of pawns.
Principle # 2.Connect both of the rooks
Rooks early in the game are pretty vulnerable to being captured since they are not connected (they don’t protect each other). That should change significantly in the middlegame where pieces are the most active and rooks need to get involved.
Because first, it will protect the back rank from any potential infiltration of enemy pieces which may cause problems. And second, unconnected rooks are a liability that needs to be moved whenever they are attacked.
Adding to this rooks are actually participating in any combinations that you may want to use in the middle game. They can double to control a file or do a rook lift to start attacking the king which is always a plus.
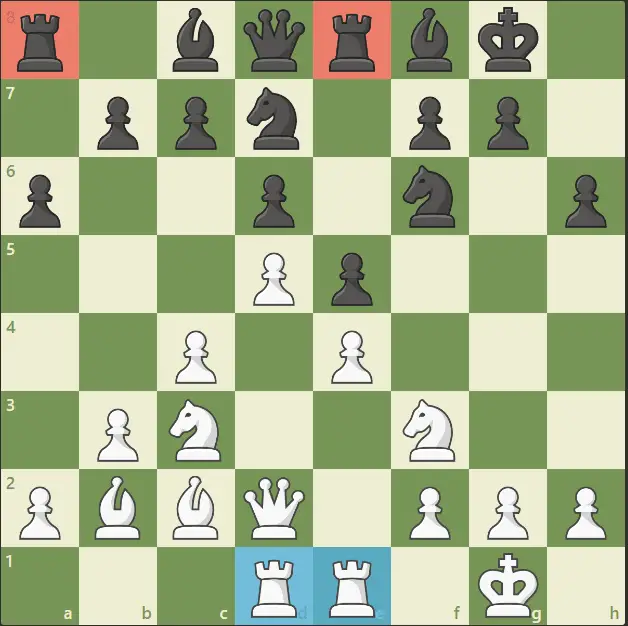
The image above perfectly demonstrates a case where rooks have been connected in the middlegame. It may not look that much but both of the white rooks do have a lot of potentials to be converted into something very active.
Compare that with the rooks of black which are barely connected and will not be any time soon. Those weak black rooks (especially the one on the left) are liabilities that have to be moved when attacked.
White rooks are more secure and have a lot of space to work with since they are connected. White’s back rank is more solid too, so you should try to accomplish a connected setup such as with white during the middlegame.
Principle # 3.Control open files using the rooks
Files are the term used to describe vertical sections of the board (up and down), which rooks generally dominate. An open file especially is a treat that should be grabbed immediately (with the rook) during a middlegame scuffle.
A file becomes open when both of its pawns (from black and white) have been captured or moved to another file. This means that the rook is free to grab the vertical space and control important places.
A doubled rook is what people usually use to control a file and deny any takeovers. A rook that has control of a file usually becomes more active and beneficial long-term than those that aren’t.
Look at this:
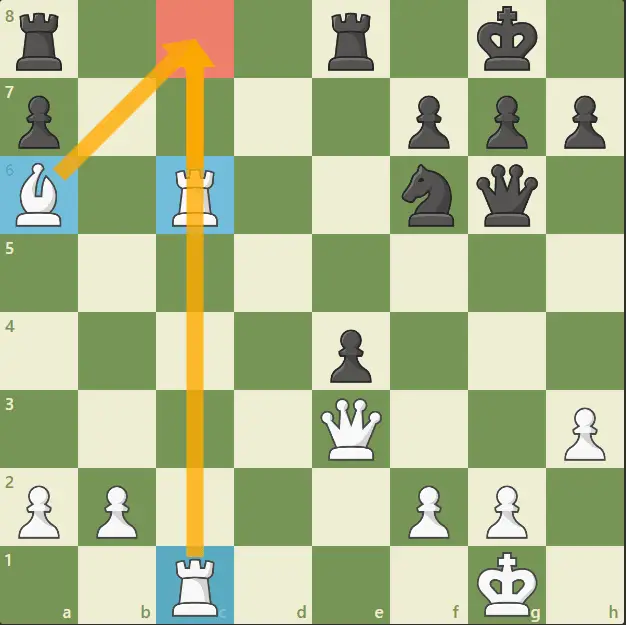
White has complete control of the c-file where the double rooks are in place which totally seals the position. Both of those white rooks can freely have an influence on other sections of the board without being interrupted.
From that c-file, the white rooks can indirectly influence any other ranks (horizontal) with ease due to the spaces. And notice that the white bishop controls the space where the black rooks may challenge the doubled rooks.
This is what it means to control an open file with the rooks, it’s just a monster space advantage. And you should do it too, so you could earn the benefits of having an easy to maneuver rooks in the middle game.
How do you decide exchanges during the middlegame?
One should seek to exchange in the middlegame when they are ahead in material (to simplify), the exchanged piece is a bad/inactive one, or it is a knight for a bishop (since the bishop is more valuable).
Principle # 4.Exchange pieces when ahead in material
The goal in the middlegame is not necessarily to destroy your opponent with a single hit attack ending everything. There are instances where it’s better to hold onto material advantage and simplify to an endgame.
Middlegames after all are extremely complicated where material advantage may not mean that much. In this phase, there will always be chances to strike an attack or whip a combination that equalizes the material.
This is why one of the principles is to exchange materials in the middlegame when you have a material advantage. This will make conversion extremely simple and reduces the chances of my game turning around.
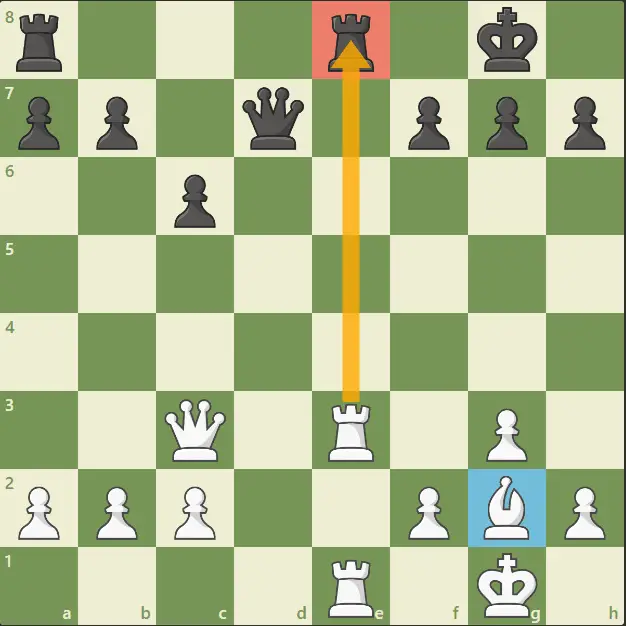
As you can see with the example above, white is up a whole bishop and should choose to trade those doubled rooks on the e-file.
Yes, we have discussed before the value of doubled rooks and why you should keep them, but exchanging at this point is the best move.
Black can potentially launch a counterattack when there are numerous pieces still on the board, maybe win that bishop back. It’s just easier to simplify by trading the doubled rooks turning it into an endgame of a queen against a queen/bishop.
And the game without the rooks is definitely much more likely to convert than with all the complications the rook pieces will bring.
This is why you should not head straight into an endgame by trading material (when having a material advantage) in the middle game.
Principle # 5.Exchange bad/inactive pieces
During the middlegame, both players should have a significant amount of developed pieces ready for battle. This does not mean that every piece will be active in fact, there will always be that one that is underdeveloped.
This is why you should seek to trade a bad/inactive piece for an opponent’s good one if possible. Not only would you eliminate the need to maneuver the piece on a good square, but you also removed an active piece for your opponent.
This can be useful when having a cramped position where some pieces have very bleak futures. It is just easier to exchange the bad piece than spend two to three moves finding a good square.
I have humored black a lot, so black is the star in this example:
The black bishop as you can see, used to reside in its starting square where it is unlikely to be developed easily. Instead of just doing a fianchetto (b7) or something, black actually tried to trade for the white bishop.
The white bishop is extremely active even threatening to capture the h7 pawn once the Knight moves from guarding it. The white bishop can’t possibly avoid the trade since the rook behind will fall and black wins the exchange.
This is the kind of position you should be looking for when trying to trade a bad/inactive piece for a good one, one that is unavoidable.
This is really helpful for black, so you should try to implement this principle in the middlegame if there’s an opportunity.
Principle # 6.Preserve the bishop pair
The bishop pair is just inherently more valuable than the knight pair in most situations, especially in the endgame. I know we’re not supposed to be talking about the endgame, but the middlegame leads to it, so it is a preparation.
You cannot use the bishop in the endgame if you have traded it for a knight in the middlegame. This is why it is generally recommended to preserve the bishop pair at any cost or to only trade it for the opponent’s own bishop.
It has more range, easier to use, and faster than a knight when having a side by side comparison. Knights can be more powerful in the middlegame yes, but the value of the bishop in the endgame just overshines that.
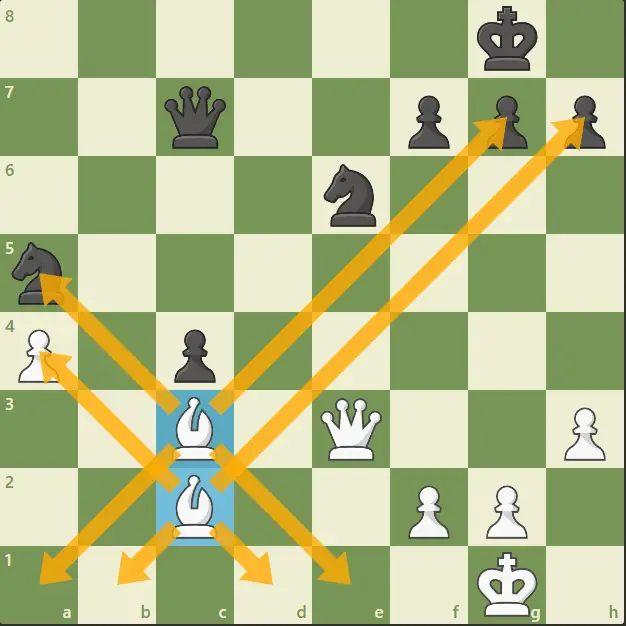
The example above demonstrates the power of the bishop pair against a knight pair in terms of its reach. The bishop pair are monsters being able to attack the kingside, escort the pawns, and attack the knight pieces all at the same time.
And this is technically still the middlegame, so it just shows how the bishop is more powerful as long as it has space. This position wouldn’t have been realized if White had chosen to keep the Knights instead of the bishop.
The black knights here are really struggling to accomplish their priorities even though they have a passed pawn themselves. This kind of domination is why you should keep the bishop pair in your own games if it is possible.
How should the player deal with pawns in the middlegame?
A player should seek to maintain a connected pawn structure, pawns toward the center, a solid pawn set up in front of the King (by not pushing it), and look to capture weak pawns in the middlegame.
Principle # 7.Maintain a connected pawn structure
A connected pawn structure typically means what you think it means, pawns that are arranged side-by-side and defending each other. These types of pawns structure are very well defended where it does not allow most pieces to take advantage of them.
An unconnected pawn structure is usually weak and something that would easily fall into an attack. A player should seek to maintain a connected pawn structure (in the middlegame) to avoid such weaknesses.
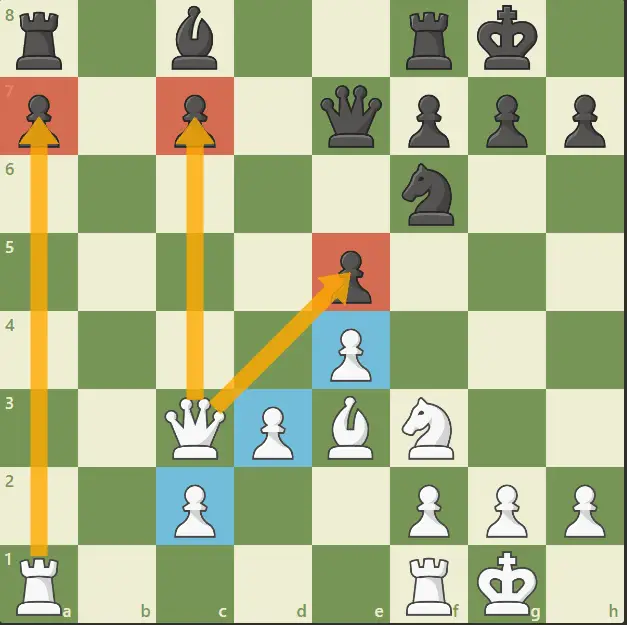
The picture above demonstrates this perfectly with white having a well-established connected pawn structure in the center while black has multiple isolated pawns.
Those central pawns are really strong and tough to break, it’s hard to imagine that those will be picked up anytime soon.
Black’s queenside pawns on the other hand are extremely weak where it will surely be a target for attacks. And they are isolated too, meaning all the other pawns won’t be able to defend them since there’s no pawn available to do so.
In fact the a7 pawn is already under attack and would be eliminated if not pushed, even if it is pushed it is just an uncomfortable position still.
These kinds of hassles would have been prevented if black only decided to keep a connected pawn structure (though it is unavoidable sometimes).
If you want to learn more about different types of pawn structures my article (will open in a new tab) will help you with that.
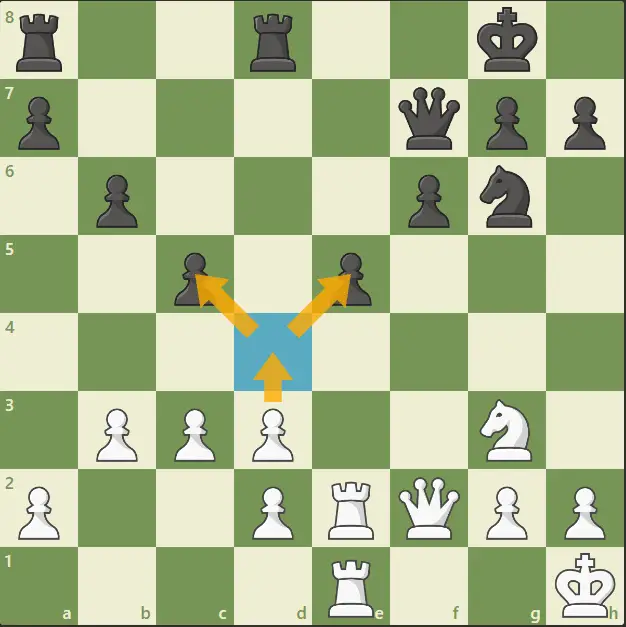
Principle # 8.Capture pawns toward the center
This has been briefly alluded to the example above where the pawns are not only connected but are also placed near the center. What the center has is space, it gives a lot of influence for pawns and pieces that are near it.
This is why you should always capture towards the center when given the opportunity to choose where the pawns may end up.
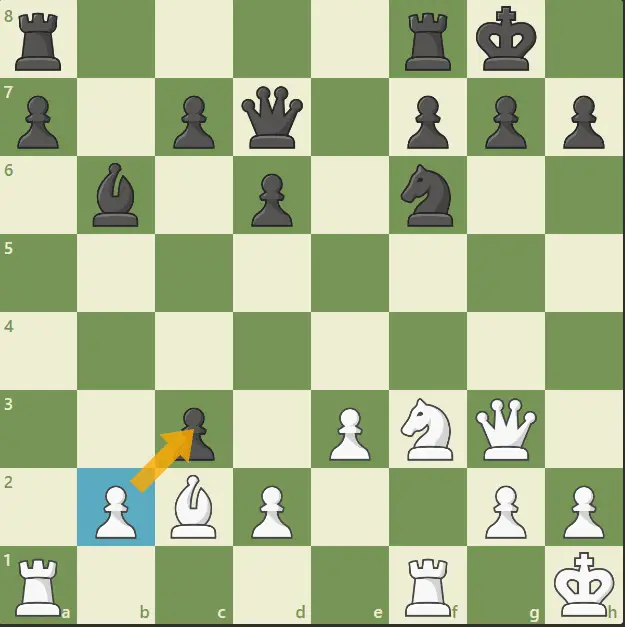
In the example above, white has just captured at c3 where white could either capture back with the b2 or d2 pawn. If white captured with d2 it would be moving the pawns away from the center which is not ideal.
The correct play is capturing with the b2 pawn and creating a mass in the center ready to exploit the spaces within it. Of course don’t get me wrong, there are exceptions where you would want to capture near the center if it could give an advantage.
But that is not the case most of the time, the pawns in the center are just more influential and useful than the one at the corner. So you should choose to capture towards the center if given a choice like this in the middlegame, it is beneficial.
Principle # 9.Limit pawn pushes in front of the King
The kings are normally castled to safe spaces early in the game heading towards the middlegame. This is done of course to keep the King safe, which will be nullified if a pawn push is made in front of it.
It will weaken the Kingside position allowing opportunities to create combinations/pawn pushes that would endanger the king. This is why you should limit the pawn pushes in front of the king in the middlegame since it is too risky.
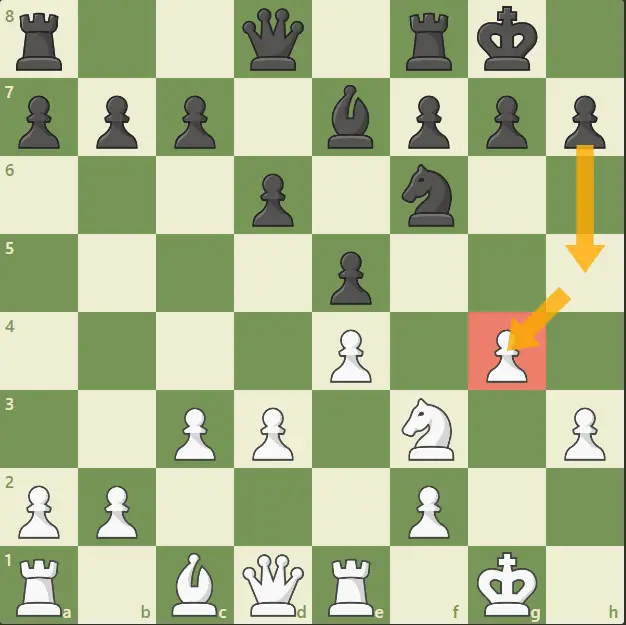
In this example white just pushed the pawns in front of the king weakening the kingside and giving some openings. There aren’t any apparent one-hit combo that ends the game instantly, but the position does look ugly.
There are many variations black can choose to go for here in order to gain an advantage (pawn push, queen-bishop battery, etc.) you get the point. The one who starts pushing pawns in front of the king usually gets attacked earlier than the other.
There are exceptions to this though since even Aronian (top grandmaster) likes to play the kingside castle a4. But of course for the general population that are not professionals, this is a good guideline to follow in order to have a solid kingside.
Principle # 10.Exchange doubled pawns
Doubled pawns are pawns residing on the same file (vertical) which blocks each other’s advance and is generally weak.
Due to the fact that pawns can only go forward, it’s almost as if there’s only one pawn (since the one in the back can’t move to the one at the front).
This is why it is generally recommended as a principle to exchange any doubled pawns during the middlegame. It is a weakness that can easily be piled on for attacks and is a liability for other pieces.
The example from above hosts a doubled pawn in form of the d2 and d3 pawns, which is a weakness that can be attacked incrementally. White should get rid of this by pushing d3 to d4, forcing an exchange of pawns that will eliminate the doubled pawn.
Once the black rooks have secured the file and the longer allowed the push, it would be hard to defend the weakness. There aren’t any nearby pawns that could protect the weakened pawn and make some sort of a pawn chain (only pieces can defend it).
This is a serious vulnerability that has to be addressed before it results in the creation of more weaknesses. These doubled pawns are the theme of some middlegame encounters, so you should get rid of them when possible.
How should you deal with the opponent’s pawns during the middlegame?
One should look for pawn weaknesses on enemy ranks (during the middlegame) that could be targeted for attacks, and pile up an attack until eventually winning the pawn.
Principle # 11.Pile up and attack weak pawns
You don’t want any of the friendly weak pawns to be targeted for attacks, that goes the same for your opponent which means you should.
Weak pawns are generally easy to get picked up since they don’t have corresponding pawns that could defend them during an attack.
The tempo (speed) is really important for these battles since the one who is early will determine the fate of the pawn. One should quickly realize the weakness of his opponent’s pawns and launch a scheme in hopes of capturing them.
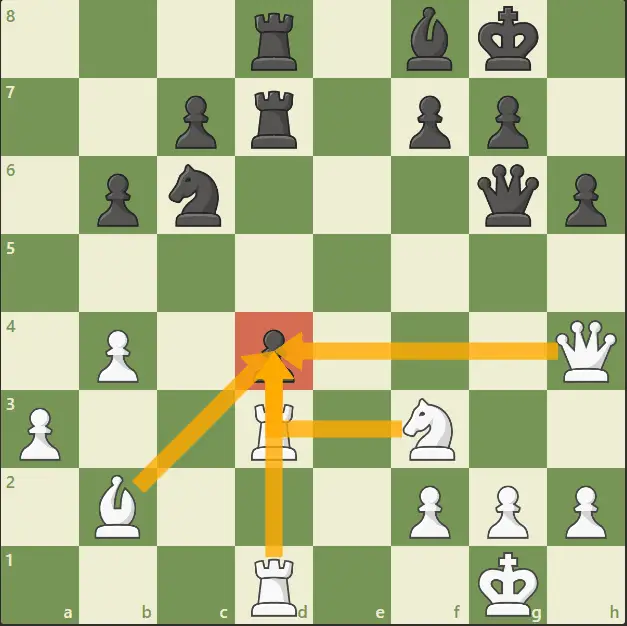
The d4 black pawn isn’t exactly a weak pawn since the black c-pawn can still technically defend, but it isn’t in this case. The black c-pawn cannot advance due to the blockage of the knight and the d4 pawn is being piled up without hopes of defending.
Unfortunately for black there are no real moves here that would save the pawn, only suspicious attempts are possible. This demonstrates the vulnerabilities of such pawns and why you should target them for attacks if possible.
Have you learned all the middlegame principles in chess?
The middlegame really contains the essence of chess, it has attacks, defense, and there are artistic possibilities waiting to be unfolded. Learning to master this phase of the game is extremely important if you want to become a good player.
And frankly this part is the hardest one to learn more than any other. Both the opening and the endgame have theories (decisive combinations) which you may notice the middlegame lacks.
We can only have guidelines to follow, not exact motifs which this article tries to accomplish (guideline). I hope you have learned a lot from reading this one, sleep well and play chess.